How to Remove Lash Extensions at Home: A Safe 15-Minute Method
Author: Michael

We'll share a safe 15-minute technique that uses oil-based products to dissolve lash adhesive. Beauty experts confirm that oils break down the extension glue, which makes removal gentle and safe. Steam treatments can also loosen the adhesive. This offers another option to anyone asking about the quickest way to remove eyelash extensions at home. You might be between appointments or ready to take a break from extensions. Either way, these safety-focused methods will help you remove those extensions without worry. Let's get started and free those natural lashes!
Why Removing Lash Extensions at Home Needs Caution

Image Source: Beautique Lashes
Removing lash extensions looks simple enough, but beauty professionals warn against trying it yourself, and with good reason too. Your eyes' delicate area needs careful thought before you try any removal techniques at home.
Risks of DIY Removal
You could seriously damage your natural lashes by removing extensions yourself. Pulling or tugging at extensions might break or completely remove your natural lashes. Your lash follicles could suffer permanent damage, leaving you with thinning lashes or bald spots. The risk of eye infections makes DIY removal even more dangerous. Your eyes' surrounding area stays sensitive, and bacteria introduced during removal can cause redness, irritation, or serious infections. Professional lash technicians use sterilized tools in sanitized spaces to avoid these issues. Eye irritation happens often with home removal attempts. People try oils or household products not meant to go near eyes. These substances can burn or irritate your eyes if they make contact. DIY removal rarely gets all the extensions off. Professional adhesive creates strong bonds that won't break down easily. Without the right products, you'll struggle to remove everything properly.
When It's Safe to Do It Yourself
Some situations make home removal okay. You might try gentle removal methods if most extensions have fallen out naturally and just a few remain. The time between appointments might leave you unable to visit a salon right away. Steam or oil-based products can help loosen the adhesive - we'll talk about these techniques later. These methods work slowly rather than all at once, which protects your natural lashes better. Clean your hands and tools completely before trying any removal. Stop immediately if you feel pain, irritation, or resistance while removing extensions. These signs tell you to see a professional instead of continuing on your own.
What You Need Before You Start

Image Source: Lashify
Getting the right supplies makes a big difference in safely removing lash extensions at home. The right preparation can help you avoid damaging your natural lashes and make the whole process smoother.
Essential Tools Checklist
You'll need specific tools to remove lash extensions safely. Here's what to gather:
Cotton pads or rounds – These help you apply oil and soak the lashes
Microfiber brushes or clean spoolies – You'll need these to brush through lashes during and after removal
Small bowl – Perfect to warm oils or create steam
Clean towel – Use it as a steam tent or to dry your face
Mirror – A magnifying one helps you see better
Oil of choice – Check out the recommendations below
Gentle lash cleanser – This removes makeup and debris first
A clean workspace helps you stay organized. Keep all your supplies within reach and make sure you have good lighting to see your lashes clearly. Clean hands are a must to keep bacteria away from your eyes.
Best Oils for Lash Removal
Oils break down lash adhesive really well because glues are lipophilic—they dissolve when oil touches them. Here are your best options:
Coconut oil is one of the safest and best choices you can make. It breaks down the adhesive bond without irritating your natural lashes or the skin around your eyes.
Olive oil works like coconut oil and gives better results when slightly warmed. Extra virgin olive oil is your best bet, but you might need to apply it several times.
Castor oil helps your lashes grow thicker while removing extensions. It takes longer to dissolve the adhesive than other oils. Women who are pregnant should skip this option.
Mineral oil works great if you have sensitive skin because it rarely causes irritation or allergic reactions.
Each oil works differently to break down lash adhesive. Warm your chosen oil until it feels comfortable—never hot—to get the best results.
How to Prepare Your Face and Lashes
Good preparation will give a solid foundation to remove lash extensions successfully. The right preparation of your face and lashes makes the whole ordeal safer and helps the process work better.
Cleanse Your Face Properly
Your first step is to remove all makeup traces. This is a vital step before you start removing lash extensions. The gentle nature of lash extension cleansers means they can't remove face or eye makeup well. Clean lashes will help you work better. "Begin by washing your face as you normally would, avoiding any vigorous scrubbing around the eye area," advises lash experts [1]. Choose a face cleanser without oils since they can break down the adhesive randomly and complicate the removal. A cotton swab with oil-free makeup remover works best to clean eyeliner near your lash line. This targeted cleaning stops makeup from getting in the way when you remove the extensions. The key points to remember:
Use gentle, circular motions
Avoid tugging on the lash extensions
Keep cleansers away from your eyes
Dry Your Lashes Gently
The drying process matters just as much as cleaning. Wet lashes weigh more and can fall out early if you handle them roughly. "Once both eyes are clean, you can gently pat the area around the eyes with an ultra-soft towel. Don't touch your lashes with the towel - instead, just let them air dry," recommends beauty experts [2]. A towel's friction can loosen extensions or make them stick together. Professional lash artists suggest using a mini lash fan to dry faster without damage [3]. These fans provide soft airflow that dries lashes while protecting the extensions and adhesive bonds. Natural air drying works well if you don't own a specialized fan. Note that patience during preparation will help you remove extensions safely. Quick cleaning and drying often cause problems later.
Step 1: Steam Your Face to Loosen Adhesive
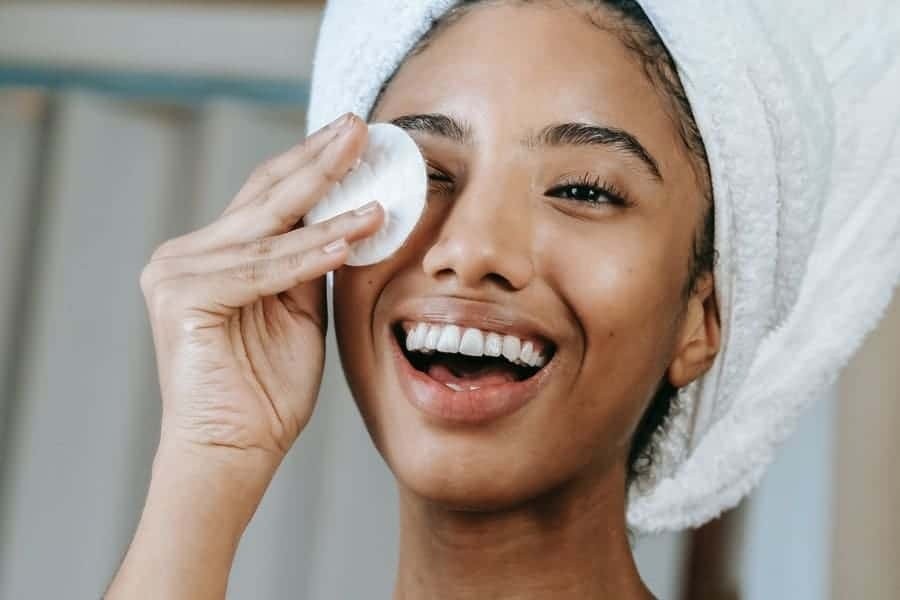
Image Source: Beauty Courses Online
Steam is the original and maybe the most significant step to remove lash extensions at home. Heat from steam softens the adhesive bonds by a lot, which makes removal easier and gentler on your natural lashes.
How to Create a Safe Steam Tent
You don't need special equipment to create an effective steam environment. Several practical methods work well:
Bowl method: Fill a medium-sized bowl with 3-4 cups of hot (not boiling) water. Place the bowl on a stable surface, then drape a towel over your head and the bowl to create a tent that traps steam. Your face should be about 12-18 inches above the water to avoid burns.
Shower alternative: A hot shower creates natural steam that helps loosen lash adhesive. Let the shower stream hit your face so the steam can work on your lash line.
Facial steamer: A facial steamer gives you consistent steam and better control over temperature and intensity.
Hot towel method: Soak a small towel in hot water, squeeze out extra moisture, and place it gently over your closed eyes.
Your eyes should stay closed during steaming to prevent irritation from water or steam.
How Long to Steam for Best Results
Steam for 10-15 minutes to get the best results. This time allows the adhesive bonds to weaken without making your skin sensitive or uncomfortable. Stay at a comfortable distance from your steam source. The bowl method might need water reheating once it cools. Steam should feel warm and pleasant on your skin - never too hot. Note that taking time with this step makes the whole process easier. Quick steaming makes removal harder and might damage your natural lashes. After steaming, your lash adhesive should feel softer, ready for the next step of applying oil to break down the glue further.
Step 2: Apply Oil to Break Down Glue
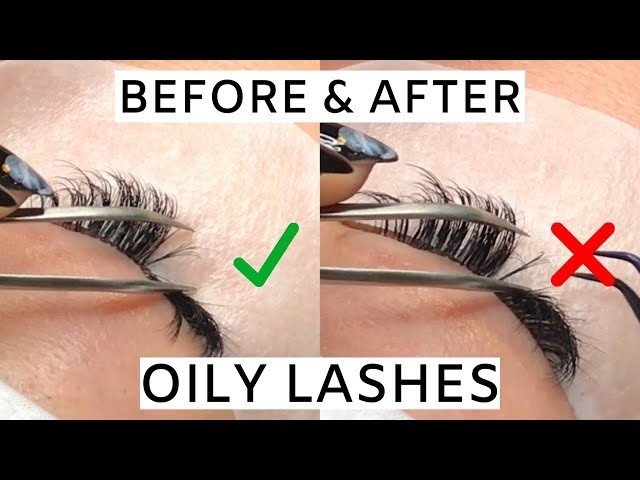
Image Source: YouTube
The next vital step after steaming your face is applying oil to break down the adhesive in your lash extensions. This method works because lash glue is lipophilic—it dissolves when it comes in contact with oils.
Choosing the Right Oil
Different oils have varying effects on lash extension removal. Let's look at these top options:
Coconut oil stands out as the safest and best choice. Its molecular structure breaks down the adhesive bond without causing irritation to your eyes or skin. Most professional lash artists recommend this as their first pick.
Olive oil, especially extra virgin olive oil, makes a great substitute. Your stubborn adhesive might need multiple applications, but its gentle nature suits sensitive skin perfectly.
Castor oil does more than just remove adhesive—it strengthens and conditions your natural lashes too. The process takes longer than other oils and pregnant women should stay away from it.
Mineral oil is perfect for people with sensitive skin around their eyes because it rarely causes irritation or allergic reactions.
How to Apply Oil Safely
Pick your oil and follow these steps for safe application:
Warm a small amount of oil in a bowl for a few seconds. Test it with your finger—it should feel warm, never hot.
Take a clean cotton round or pad and soak it in the warmed oil. The pad should be wet but not dripping.
Close your eye and hold the oil-soaked pad against your lash line for 2-3 minutes. Your eye must stay closed the whole time to keep oil from getting in.
Don't pull or tug on the lashes. Let the oil naturally dissolve the adhesive bonds.
Some extensions might need another round of oil application. Wait a few more minutes before trying to remove them.
A quick safety tip: your eyes must stay closed during the whole process to avoid irritation that could blur your vision or cause discomfort. If some extensions stick stubbornly, don't force them off. Just apply more oil and try again to protect your natural lashes.
Step 3: Gently Comb Through Lashes
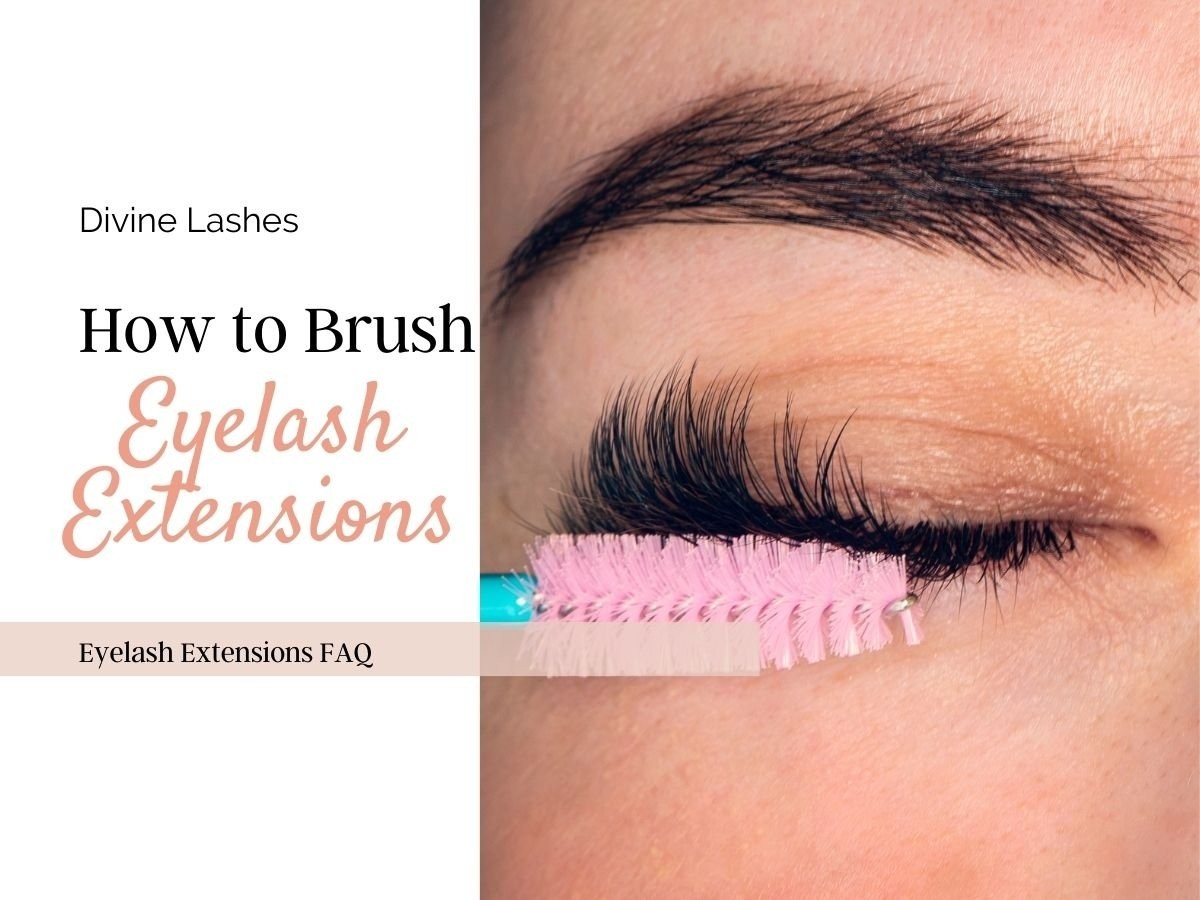
Image Source: Divine Lashes
The oil works its magic on the lash adhesive. Then comes the significant phase of combing through your lashes. This step needs a gentle touch to protect your natural lashes.
Using a Clean Spoolie
A good tool makes all the difference in safe lash extension removal. Soft-bristled clean spoolie brushes or mascara wands work best. They provide the perfect mix of gentleness and results. Here's how to comb through your lashes:
Hold the clean spoolie at a 45-degree angle to your lash line
Start at the outer edge of your lashes where extensions may be loosest
Gently brush your lashes in an upward and outward motion, going over the top rather than underneath
Limit brushing to 10-15 seconds per eye to prevent damage
Avoid brushing directly at the lash line where extensions bond to natural lashes
"Brushing your lashes is equivalent to cleaning them," explain lash experts. The soft bristles help remove leftover oil and separate any lashes stuck together from the oil. Metal-toothed eyelash combs should never be used. They might seem better but can easily snag and damage both extensions and your natural lashes.
Signs the Extensions Are Ready to Fall
Your natural lashes stay safe when you know the right time to remove extensions. Look for these clear signs that your extensions are ready:
Extensions start lifting slightly from your natural lash line. This small lift shows the adhesive bond getting weaker. They feel different and move more freely when brushed.
Loose extensions slide off easily during gentle combing. Stop right away if you feel any pulling or tugging - the adhesive needs more time to break down.
Extensions should fall naturally with gentle combing. Some might land on your cheeks or stick to the spoolie. This easy release means the adhesive has broken down properly.
Stubborn extensions need more patience. Apply more oil and wait longer before trying again. Your natural lashes stay protected when you take your time with removal.
Step 4: Repeat Oil Application if Needed
Patience will be your best friend while learning to remove lash extensions at home. A single oil application might not break down tough adhesive bonds.
How Long to Wait Between Applications
The first oil application and gentle combing will loosen some extensions while others stay put. These stubborn lashes need a second oil treatment. You should wait 2-3 minutes between applications. This gives the oil enough time to work without irritating your eyes. Don't pull or rub the stubborn extensions. Let the oil dissolve the adhesive bonds naturally. Lash experts say "It's important to be patient and wait until those eyelashes fall off on their own." Use a fresh cotton pad with new oil for each application. This will keep the oil clean and effective throughout the process.
When to Stop
You need to know the right time to stop applying oil. Here are signs that tell you when:
Stop the process for the day if 3-4 oil applications haven't loosened certain extensions. More attempts could harm your natural lashes or irritate your eyes.
The next morning, wash your face as usual and comb through your lashes gently. The overnight break helps the oil penetrate the adhesive better.
You can hide any remaining stubborn extensions by curling your lashes and adding mascara. Try the oil application process again that evening.
The complete removal might take a couple more days, but your extensions will come off safely if you stick to this routine. This slow and steady approach protects your natural lashes better than forced removal.
How to Remove Stubborn Lash Extensions
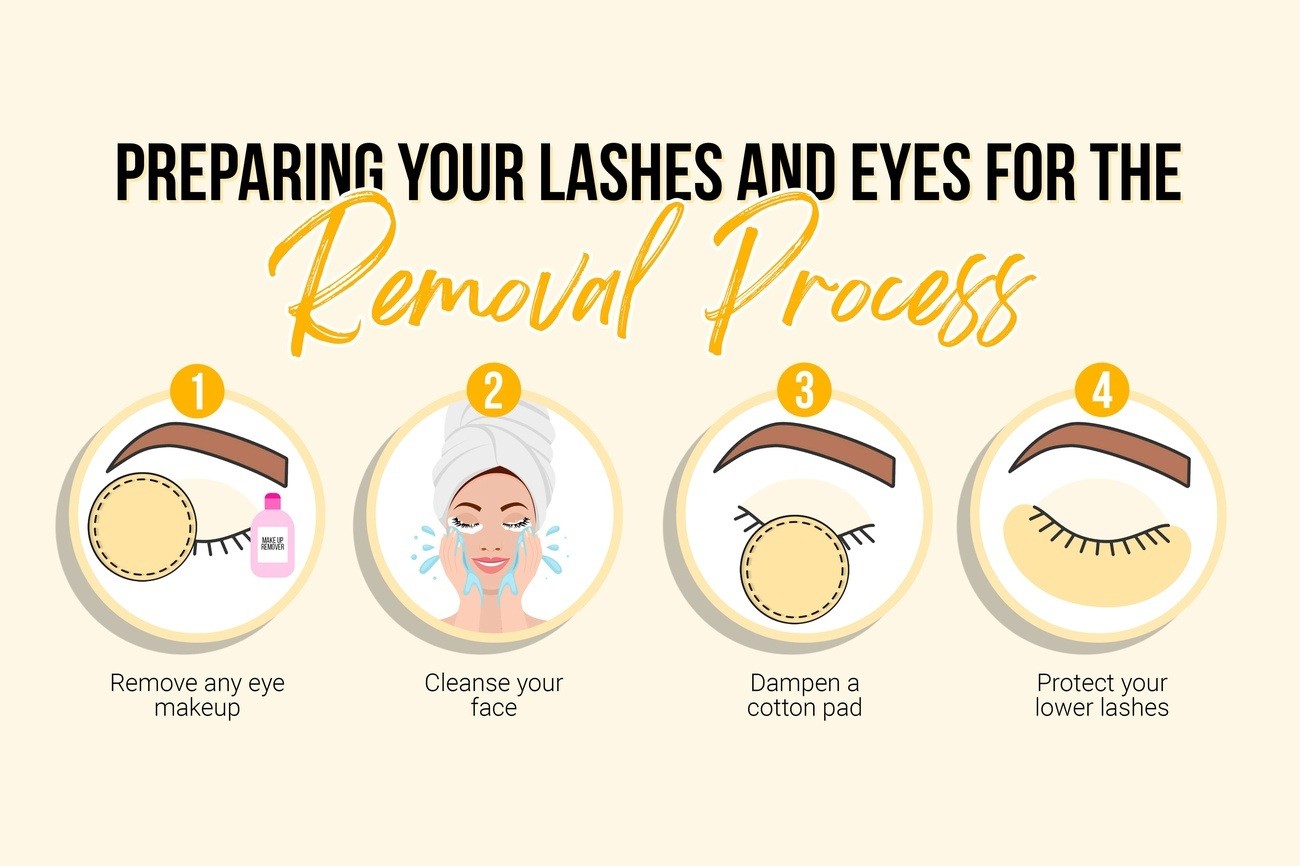
Image Source: Forabeli
Some stubborn lash extensions won't come off even after you apply oil multiple times. You'll need special techniques beyond the simple removal process to deal with these tough ones.
When to Re-Steam
Your first removal attempts might not work on some very stubborn lash extensions. Steam treatment can work wonders in these cases. You should start another steam session once your last oil application dries completely. The second steam session needs more time than your first one. Plan for 15-20 minutes of continuous steaming instead of the original 10-15 minutes. Steam exposure will weaken the adhesive bonds that oil applications have started to break down. The best approach combines warm oil application with steaming. Apply the oil right after steaming while your lashes are still damp. This combination often succeeds where single methods don't work. Let it sit for 3-5 minutes before you comb through your lashes again.
When to Seek Professional Help
You should recognize these signs that tell you it's time to stop DIY removal:
Pain or discomfort during removal attempts
Redness, swelling, or irritation around your eyes that gets worse as you try
No progress after 2-3 days of consistent home attempts
Extensions still firmly attached after multiple steam and oil treatments
A professional's help will protect your natural lashes from damage. Lash technicians use specialized removal products with stronger solvents than household oils. These products can dissolve tough adhesive bonds without harming your natural lashes. Professional products come in cream form rather than liquid. This gives better control and reduces irritation risk compared to home remedies. A professional can remove all extensions in just 30-45 minutes and will keep your lashes healthy throughout the process.
How to Remove Lash Extensions Without Damaging Natural Lashes

Image Source: eslashes
Your natural lashes should be your top priority during the whole ordeal of extension removal. Even with proper steaming and oil application, wrong removal techniques can damage follicles, break lashes, and maybe even cause permanent lash loss.
Avoid Pulling or Tugging
The golden rule of removing lash extensions is to never pull or tug at them. Lash experts warn, "Picking at your lashes would be the worst possible thing you can do. This will result in bald spots throughout the lash line." You risk pulling out your natural lashes along with extensions if you tug at them. Watch out for these warning signs that show you're using too much force:
Pain or discomfort
Redness at the lash line
Natural lashes falling out with extensions
Extensions resisting removal
The adhesive hasn't broken down completely if extensions don't come off easily after oil application. You should reapply oil instead of pulling harder.
Use Gentle Downward Motions
The way you move your hands can make a big difference in preventing damage. Here's the proper technique:
Hold your spoolie at a 45-degree angle against your lash line
Brush downward from your lashes' top
Use light, sweeping strokes instead of forceful ones
Switch between downward and outward motions to ease extensions away
These motions follow your natural lashes' growth direction. Moving against this direction puts unnecessary stress that can weaken or break lashes at the root. A cotton pad soaked in oil placed under your lashes while brushing downward helps with stubborn extensions. This creates a cushion that protects individual lashes from too much pressure and catches removed extensions. Note that patience will save your natural lashes. Rushing through removal can cause damage that takes months to fix. Taking extra time to protect your natural lashes is worth the effort.
What is the Fastest Way to Remove Eyelash Extensions at Home?

Image Source: Luminous Nail Bar
Looking to speed up your lash extension removal? You're not alone. Many people want a quick solution that's still safe. Here's the quickest way to combine techniques and get the best results.
Combining Steam and Oil
The best way to speed up lash extension removal comes from using steam and oil treatments together. This two-step method breaks down the adhesive:
Start with a 10-15 minute steam session to loosen the bonds
Apply warm oil right after steaming while your lashes stay warm
Let it sit 3-5 minutes before you comb through lashes
Keep repeating with minimal gaps between steps
"By attempting to remove your lash extensions at home you may cause excessive damage to the natural lashes or may even lose the natural lash," cautions Jill Medicis, Lashify Pro and Pro Educator [4]. This combined method balances speed and safety well. You can speed things up with an oil-based cleanser. "Try incorporating oil as the first step in your double-cleanse to help loosen any leftover lashes," recommend beauty experts [5]. This method fits into your skincare routine smoothly.
Why Patience Still Matters
The fastest methods won't give you instant results. "Nothing is going to work as quickly as a professional lash remover," notes licensed esthetician Christina Clark [6]. Your natural lashes can get damaged if you rush the process. The adhesive needs proper time to dissolve before extensions come off safely. No method can change this basic fact. A complete removal needs:
Several application cycles (even with combined methods)
A few days for stubborn extensions sometimes
Gentle handling throughout
The rush to remove extensions quickly often leads to damaged natural lashes that take longer to recover. One expert warns, "When you're attempting to remove your lash extensions at home you may cause excessive damage" [4]. The safest quick method puts your lash health first.
How to Remove Fake Eyelashes vs. Lash Extensions
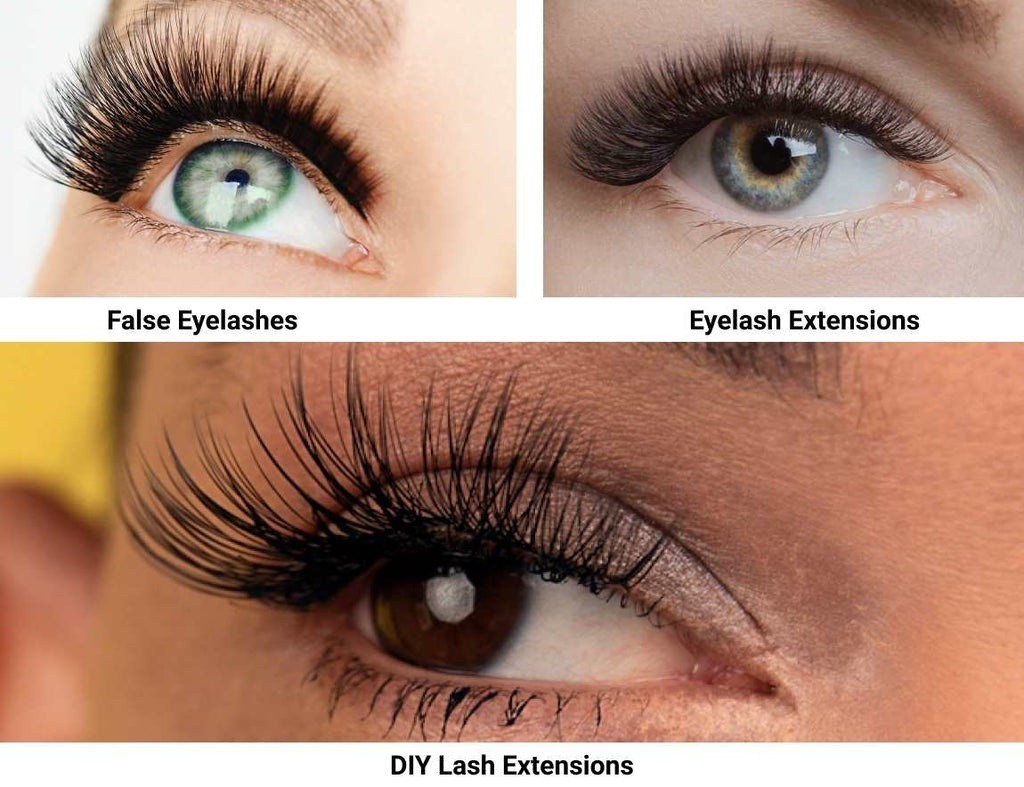
Image Source: Lilac St.
Beauty lovers often mix up lash extensions with fake eyelashes. These two beauty enhancers need completely different removal methods. Learning the differences helps protect your natural lashes from damage.
Key Differences in Removal
Fake eyelashes (also called falsies or strip lashes) stick to your eyelid with temporary adhesive on a fabric band. Lash extensions work differently - they bond directly to your natural lashes with special glue. This basic difference determines how you should remove them. Fake eyelashes come off easily:
Hold a cotton pad with makeup remover or oil against your lash line for 10-20 seconds
Once the glue loosens, peel gently from the outer corner inward
You'll finish the whole process in less than a minute
Lash extensions need a gentler touch because they attach to your natural lashes, not your skin. As I wrote in earlier sections, removing extensions needs steam, oils, and careful combing. This process takes 15+ minutes or several days. You can safely remove fake lashes at home without professional help. These lashes last 5-20 times depending on their quality and material. Synthetic false lashes work well for up to five applications. Higher-quality mink or silk varieties can last up to 20 uses with good cleaning and storage.
Why Methods Differ
Each lash type uses different glue, which explains their removal needs. Strip lash glue works for one-day wear and easy removal. Oils and makeup removers break it down quickly. Extension adhesive lasts through tears, sweat, and oil for weeks. This professional-grade glue creates stronger bonds that take more time and special products to dissolve. The attachment spot makes a big difference too. Strip lash removal just separates glue from skin. Extensions need more care - pulling them out wrongly can take your natural lashes with them and damage your lash follicles permanently.
Common Mistakes to Avoid During Removal
The right tools and techniques won't guarantee successful lash extension removal if you make common mistakes. Your natural lashes can stay healthy throughout the removal process once you know these pitfalls.
Using Harsh Chemicals
People often turn to harsh chemicals when gentler options don't work fast enough. These quick fixes can damage your lashes permanently. You might think household products, nail polish remover, or alcohol-based solutions make sense, but they can seriously irritate and harm your lashes. Most importantly, avoid using:
Products containing formaldehyde (found in 75% of professional glues tested) [7]
Removers with N-methylpyrrolidone (NMP), which can cause skin irritation and headaches
Solutions containing phthalates, which may disrupt hormone function
DIY mixtures combining multiple household chemicals
Chemical burns from wrong remover choices can damage your cornea, not just your lashes. Salon-grade removers are specifically made to dissolve lash adhesives gently without harming your delicate eye area.
Picking at Lashes
Picking at extensions is the most tempting yet destructive habit during removal. Studies show that 70% of people who pick their eyelash extensions notice significant lash loss [8]. This seemingly harmless habit creates several problems. Your natural lash line can develop thinning or bald patches that take months to recover. The hair follicles can suffer trauma from picking, which might prevent lashes from growing back. Bacteria from constant touching can cause painful infections. You might feel tempted to scrutinize your progress in a magnifying mirror, which often makes you pick at stubborn extensions. Don't give in to this urge, whatever loose they might seem. Stick to the oil application method instead. Patience protects you best against these harmful practices. Each extension will naturally detach once the adhesive dissolves completely. Force becomes not just unnecessary but harmful to your lash's health.
How to Care for Your Natural Lashes After Removal
Your natural lashes need extra care to bounce back after removing lash extensions. The right aftercare will help them get their strength and vitality back fast.
Apply Nourishing Oils
Oil treatments can do wonders for your natural lashes after extension removal. These oils pack nutrients that make lashes stronger and help them grow back healthy:
Coconut oil leads the pack as the best choice to keep fragile lashes moisturized and strong
Castor oil contains ricinoleic acid that makes lashes thicker and stronger while boosting growth
Vitamin E oil protects and repairs damaged lash follicles with its antioxidant properties
Olive oil deeply hydrates lashes to stop them from becoming brittle
The right way to use these oils starts with warming a tiny amount between your fingers. Coat your lashes gently before bed. A clean mascara wand helps spread the oil evenly through your lashes. "After your at-home eyelash extension removal, you will want to keep your lashes clean and healthy," lash experts say. Your lashes should be completely clean before you put on any oils. Regular nightly applications will give the best results.
Avoid Mascara for a Few Days
Your lashes need a complete break from mascara for 3-5 days after removing extensions. This break lets them breathe and recover without extra weight pulling them down. When you start using mascara again, skip the waterproof formulas. These need rough removal methods that can harm your recovering lashes. "Waterproof mascara is notoriously hard to remove, and often requires tugging or pulling to get the eye area completely clean," beauty professionals warn. Your lashes will thank you for these extra care steps:
Don't rub or tug around your eyes
Clean your lashes daily with a gentle, oil-free cleanser
A peptide-rich lash serum can boost growth
Sleep on your back to avoid pillow friction
Good aftercare helps your natural lashes return to their pre-extension state within weeks. They'll be healthy and strong, ready for whatever style you choose next.
Signs You Should Stop and See a Professional

Image Source: The Lash Professional
DIY lash extension removal can work, but you need to know when to stop and get professional help to protect your eyes. A few warning signs can help prevent serious issues and save your natural lashes from damage.
Pain or Irritation
Your body will tell you if something's wrong during removal. Stop what you're doing right away if you notice:
Burning or stinging sensations that don't go away after you rinse
Redness, swelling, or inflammation near your eyelids or lash line
Watery eyes that continue after washing off removal products
Blurry vision after products touch your eyes
These signs could mean you have chemical conjunctivitis or an allergic reaction to your removal products. Professional removers use products with safe pH levels that won't hurt your eyes. Regular oils or DIY solutions might cause too much discomfort. Eye infections from poor removal methods can lead to bigger issues if you ignore them. Don't keep trying at home if you feel pain, irritation, or anything unusual - see a professional right away.
Extensions Not Loosening After Multiple Tries
You should see a professional if your extensions won't come off after several attempts:
The steam-and-oil method hasn't worked after 3-4 tries over 2-3 days
The glue seems too strong and won't break down
Extensions stay stuck even when you use the right techniques
You feel tempted to pull or force them off after being patient
Lash technicians have special removal products that work better than household oils. Their professional-grade removers can dissolve tough adhesive without hurting your natural lashes. Without doubt, professional removal is the quickest way to go - it takes just 30-45 minutes instead of days of home attempts. Getting professional help ended up being the best way to protect your natural lashes from damage that often happens with long or forceful DIY removal.
How to Safely Remove Lash Extensions at Home in 15 Minutes
Want to become skilled at removing lash extensions in just 15 minutes? You can safely do at home what usually takes salons over 30 minutes [9]. This quick process adapts professional techniques for home use.
Quick Checklist for Safe Removal
Get these items ready before you start:
Professional-grade lash extension remover (gel-cream consistency works best)
Clean spoolie brush or microfiber brush
Cotton pads
Eye-safe makeup remover
Timer
Small mirror
Here's your 15-minute guide:
Minutes 0-2: Clean your face well and remove all makeup and oils from around your eyes.
Minutes 2-5: Use the applicator brush to put remover from root to tip of your lashes [10]. You need professional-grade remover here—it works by a lot faster than household oils and stays safe for eyes.
Minutes 5-10: Let the remover do its work. Professional-grade removers break down lash adhesive in 3-5 minutes, unlike DIY methods that take days [10].
Minutes 10-12: Brush through your lashes again. Extensions should slide off easily without pulling [10].
Minutes 12-15: Add more remover to stubborn lashes and brush gently until they release. Clean the eye area with a gentle cleanser to remove leftover residue.
Final Tips for Success
Your success depends on these vital factors:
Never pull or tug resistant lashes—this means the adhesive hasn't broken down fully. Patience protects your natural lashes, even with this quick method.
Professional lash extension removers like Meltaway or Nouveau Lashes Remover give the best results in 3-5 minutes [11]. These products dissolve the adhesive bonds instead of forcing them apart.
Of course, keep your eyes closed during the process to avoid irritation. Rinse right away with cool water if the remover causes stinging or burning.
This 15-minute timeline works only with professional-grade removers. Oil-based home remedies need multiple applications over several days to remove extensions completely.
Conclusion
Safe removal of lash extensions at home needs patience and proper technique instead of force or harsh chemicals. This piece shows how steam and oil work together to break down lash adhesive without harming your natural lashes. Many people find success with the 15-minute method, though stubborn extensions might need repeated applications across a day or two. Your natural lashes need protection during this process. A clean spoolie's gentle downward motions after applying oil helps extensions slide off without pulling your own lashes with them. Quick attempts at removal can damage lashes that take weeks or months to heal. Successfully removed lashes respond well to oils like coconut or castor oil that keep them fed and healthy. These natural treatments strengthen and condition your lashes while they bounce back from extensions. Your lashes need a few mascara-free days to fully recover before you return to regular makeup. Signs that you need professional help include pain, irritation, or extensions that won't budge after multiple attempts. Lash technicians use specialized removers that work better than home methods. Your eye health matters more than saving time or money. Becoming skilled at this safe removal technique provides freedom between salon visits. Your natural lashes can stay healthy with proper care and patience, whether you stick with extensions or embrace your natural look.
FAQs
Q1. How long does it typically take to remove lash extensions at home?
While professional removal takes about 30-45 minutes, at-home removal can take anywhere from 15 minutes to a few days, depending on the method used and how stubborn the extensions are. Using a combination of steam and oil treatments is usually the most effective approach.
Q2. Is it safe to remove lash extensions by myself?
Removing lash extensions at home can be safe if done correctly, but it requires patience and gentle techniques. Use oil-based products to break down the adhesive, avoid pulling or tugging, and stop immediately if you experience any pain or irritation. If extensions don't come off easily after multiple attempts, it's best to seek professional help.
Q3. What's the best oil to use for removing lash extensions?
Coconut oil is widely considered the safest and most effective choice for lash extension removal. It efficiently breaks down the adhesive without irritating your eyes or skin. Other good options include olive oil, castor oil, and mineral oil. Always ensure the oil is gently warmed and applied carefully to avoid getting it in your eyes.
Q4. How can I protect my natural lashes during the removal process?
To protect your natural lashes, avoid pulling or tugging on the extensions. Instead, use gentle downward motions with a clean spoolie brush after applying oil. Be patient and allow the adhesive to break down naturally. If extensions don't come off easily, reapply oil rather than using force. Give your lashes a break from mascara for a few days after removal and apply nourishing oils to help them recover.
Q5. What are the signs that I should stop DIY removal and see a professional?
You should stop home removal attempts and consult a professional if you experience persistent pain, burning sensations, redness, swelling, or blurred vision. Additionally, if the extensions aren't loosening after multiple removal attempts over 2-3 days, or if you're tempted to pull them off forcefully, it's time to seek professional help to avoid damaging your natural lashes.
References
[1] - https://eslashes.com/blogs/wellness/how-to-remove-lash-extensions-at-home-a-step-by-step-guide?srsltid=AfmBOooofy5kopNaPKAb7kBrBLmIOQJ3XnhTS4KSJa7XCEbSTB7Gom0A
[2] - https://lilacst.com/blogs/eyelash-health/how-to-clean-eyelash-extensions?srsltid=AfmBOooBUOcIbGRnfs77649HJw29edHWO3x8IeU-vWeiydG4fbgIZChz
[3] - https://purespadirect.com/blogs/pure-spa-direct-blog/how-to-dry-lash-extensions-expert-tips-what-to-avoid?srsltid=AfmBOoowHjUhqKYlHChHkhZxwS-QVI7Bvq_Kg5fP7PqDV6MGZf53Maa0
[4] - https://charmlash.com/lash-extensions-remover/
[5] - https://www.byrdie.com/how-to-remove-eyelash-extensions-at-home-4802386
[6] - https://greatist.com/health/how-to-remove-eyelash-extensions
[7] - https://www.sciencealert.com/eyelash-extensions-can-be-seriously-dangerous-expert-warns
[8] - https://www.hunnybunnylashes.com/post/is-picking-at-your-eyelash-extensions-ruining-your-natural-lashes-let-s-talk-about-the-potential-da
[9] - https://www.princesslashstudio.com/products/eyelash-extension-removal
[10] - https://nouveaulashes.com/eyelash-treatment-aftercare/remove-eyelash-extensions?srsltid=AfmBOoqj6mFffzaqdSkKJFaZmy4pYN8vZ5X-jwDvYxl2HwRRkhBW0Vz
[11] - https://www.lashboxla.com/products/meltaway-easy-rapid-eyelash-extension-remover